Our mission is to provide professionally trained Civil Engineers for all type of civil engineering services. Increase the supply of efficient & highly skilled Civil Engineers and serve the Civil Engineering Community.
Read MoreRoad Restraint Systems are designed to reduce the severity of injuries if a vehicle leaves the carriageway and would otherwise encounter a hazardous feature (such as on-coming vehicles, an embankment, a lighting column, trees, etc.). The Course Module shares key aspects of Road Restraint System (RRS) Design Process, RRS Examples, Innovations and RRS Standard Details. Please see the Promotional Course Videos for a quick flavour. The first module covers all types of RRS systems like flexible system, semi-rigid barriers, rigid barriers and bridge parapet. It also covers RRS family such as vehicle restraint system and pedestrian restraint system. It covers RRS appraisal process and various situations where RRS would be a preferable solution like embankment, cutting, single hazards, culverts, etc. The second module covers Road Restraint System terminologies such as containment levels, working width, set back distance, types of terminals, Length of needs, etc The third module covers Road Restraint System examples, visibility criteria, transition barriers, etc. The fourth volume covers lesson learnt in various cases such as missing working width, missing set back, missing transition barrier and broken terminals. It also covers Innovative solution like Rolling Barriers, Crash Cushions and Noise Barriers. The fifth module covers Road Restraint System standard details of the concrete barrier, steel barrier, wire rope barrier and terminals.
Read moreAutoCAD is classified as the utilization of technology to assist in the design, variation, optimization of a drawing layout. In this, we can generate both 2D and 3D drawings used in road and other infrastructure projects. To understand AutoCAD basics, you need to understand what it does: The software allows to make 2D or 3D models of a product (road, building, structures, etc). The Course Module provides step by step process to use Auto CAD from “Getting Started with CAD to various commands of operations to develop drawings and X-refs. First Module “CAD Basic” commences with a desktop icon to getting start window and then explains all the details of Menus, Tabs, Settings of CAD Window. Please click to see the Preview of the Course. The second Module provides details of using the command window and how to operate it. Then basic functions like zoom, pan, etc are detailed out. The third Module starts with drawings commands like “Arc” and “Circle”. It covers all the ways and means to operate these commands. The fourth Module covers the drawing command of “Polygon” and “Rectangle”. It provides all the ways to use these two commands in various situations. Please click to see the Preview of the Course. The fifth Module covers the drawing commands like move, copy and array. It provides a detailed process to use these commands and a combination of copy and array command too. Each module provides key tips to use the command in the most efficient way to save time and effort.
Read moreDutch Style Roundabouts are one of the most innovative roundabouts that provide priority to pedestrians and cyclists without significantly compromising vehicular traffic movement. Our Dutch Style Roundabout course modules are designed to cover all key aspects of the design process. It covers the centreline design of all four arms, crown line of Roundabout, and then gradually develops road channels, cycle tracks, footway, crossing facilities, etc. The first module starts with verification of the Topographical Survey. Here, the module explains how to verify the topo survey and make it fit to use as Xref for roundabout design. The module also explains how to change the colors of individual layers to make Xref less prominent. The second module explains the design process of Roundabout crown line, road centrelines, channel line design, entry radius design, exit radius design, splitter island design. The proposed layout set the foundation of the roundabout footprint so that footway and cycle facilities are provided safely. The third module explains the design process of cycle facility design. A circulatory uni-directional cycle track is designed. Inbound and outbound cycle tracks are designed and connected to the circulatory. The fourth module explains the process of footway design and crossing facilities. The back edge of the footways plays an important role in tie-into the existing. Segregated pedestrian and cycle crossing facilities are proposed. It is highly recommended to provide a pedestrian crossing facility suitable for blind and partially sighted pedestrians, therefore tactile are proposed at all crossing points. The fifth module explains the process of creating a General Arrangement Drawing. The module details out how to call all required Xrefs and how to use sheet layout, title frame, etc to develop General Arrangement Drawings. Finally, the module explains how to create a PDF of the General Arrangement drawing.
Read moreRoad Lighting Engineering involves the design, construction, operation & maintenance of Road Light and associated infrastructure to ensure adequate and uniform lighting levels are provided for drivers and pedestrians safety. Road lighting design supports lighting engineers to develop a lighting model to remove dark spots, provide a clear view of the road and associated infrastructure to provide a desirable minimum illumination for all road users. The first module covers key industry of road lighting engineering, basic principles of road lighting design, site assessment criteria before initiating lighting design and lighting 
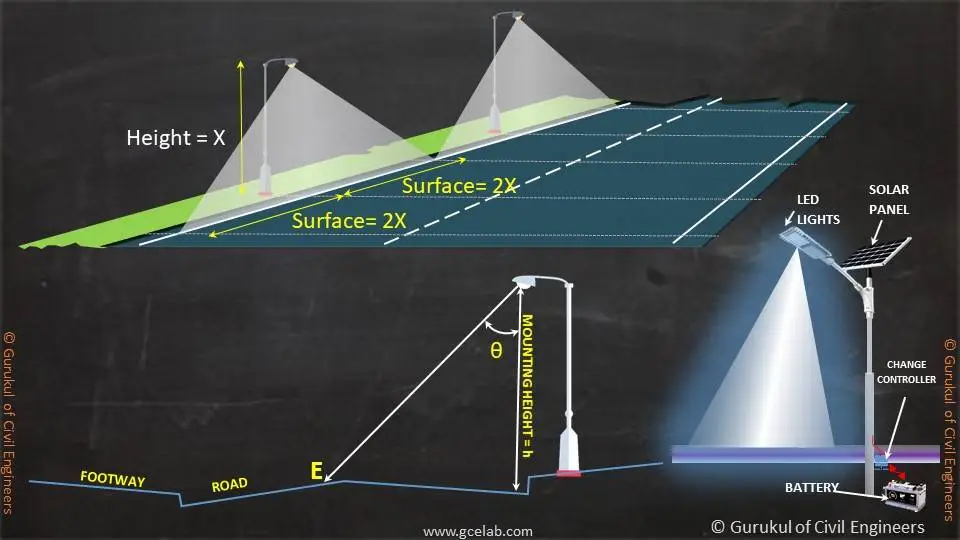
terminologies. Within lighting terminologies, we have covered set back distance, arm Length, mounting height, straight vertical distance, candela (cd), footcandle (fc), Illuminance (E), luminance (L), lux (lx), the lumen (lm). The second module covers the basics of lighting design, luminaire selection, road lighting mounting options. The primary methods of lighting design are luminance method and Illuminance method. The module also recommends the illuminance level, for various road types, junction types, mid-block crossings, etc. The module also covers the concept BUG Rating System that provides a numerical rating of the luminaire light distribution as it applies to the lighting trespass up light and glare. The third module covers lighting column protection measures. passively safe lighting columns, road lighting cable network, smart lighting systems and road lighting maintenance regime. When lighting columns are placed very close to the road edge or at a vulnerable location, it is highly possible to be crashed by an errant vehicle? There are two possible ways to protect it, by placing road restraint system or by using passively safe lighting columns. The module has described both measures in detail. The module also describes the smart road lighting system such as LoRaWAN. The fourth volume covers the features of LED Lighting, advantages of LED lighting, implementation of LED lighting and LED adoption challenges. LED lights are diodes that emit high-quality light with high lumen efficacy and high lumen outputs. The module has described LED lighting and all associated features in detail. The fifth module covers standard details of lighting columns, LED lanterns, feeder pillars and chambers. We have also provided a bonus section where we have shared 20 interview questions & tips for fresh civil engineer jobs. It will help newbie civil engineers to better prepare for job interviews.
Read morePrimavera P6 is a globally recognised one the most effective tool to plan, manage and execute civil engineering projects. But getting training of Primavera doesn’t come for free, most of the time. That’s why we develop our courses for a very nominal fee, yes you heard it right. It's only $5.00 if you are our subscribed member and you will not only get access to Primavera Course but also to all our courses that shows a $0 fee. Primavera P6 can sometimes be a complex tool to understand if your basics of using the tool are not clear. That’s why we develop our Primavera Basic Course for you to clearly explain step by step process to develop a project program. We use real-world civil engineering project examples and develop the program so you can easily grasp it and correlate it with your real-world projects. And you can view them as many times as you want. In the first module, students will learn about the following topics -Launching Primavera P6, start-up window, drop-down menus, toolbars, sidebars, option settings, etc. Please click to see the Preview of the Course. The second module provides details of Enterprise Project Systems (EPS). Primavera is a cloud-based Project Planning tool and it saves the projects program of the enterprise in EPS. So, it's very important for students to know how to operate EPS and how to create a new EPS category for a new project. The third module provides details of setting up a new project within a new EPS category within Enterprise Project Systems (EPS). The module also covers the process of developing a Work Breakdown Structure (WBS) of a new project. This is the most important step of a project before assigning any activity. The fourth module provides a detailed process of creating activities of a project. We have developed a civil engineering project program, so the activities are developed for a civil engineering project. The fifth module provides a detailed process of setting up the calendar of the project. Primavera provides global and project-specific calendar options. It would be very useful to know when to use what type of calendar. The module also explains how to assign a calendar to a project. The sixth module explains the process of setting the layout page of the project program. It explains how to set the columns for activities, the Gant chart and the activity area. you can also customise the layout for a specific project or for a specific user. The seventh module covers the process of linking activities in three possible ways. It also provides details of predecessor and successor linking. The module also explains the linking process in a specific constraint situation and shows how that impacts the overall project duration. In the end, a high-level project program is created to demonstrate the whole process of project planning using Primavera P6.
Read moreSkill Improvement Leads to Employability:- GCE Evaluates & Provides a Detailed Performance Result.
At GCE, we provide course completion certificates of all courses. Our certificate comes with unique QR Code to validate it online & download it whenever needed.
We build your CV with professionally designed Resume Builder Application. Our Resume Builder is not just another resume creation tool; it is the finest tool to present your career graph.
Our mission is to provide professionally trained Civil Engineers for all type of civil engineering services....
Copyright © 2024 Gurukul of Civil Engineers | All Right Reserved | Design & Developed By Ntier Infotech India.